It’s an exciting time to be a DIY music producer. The gap of recording quality between home and professional studios is growing smaller by the year. It’s now possible to produce a “radio-ready” track straight from the comfort of your home studio.
For those who aren’t experienced studio engineers, setting up this home studio can be an intimidating task.
Do I need a multi-track mixer?
What about a PA system?
How much should I spend on studio monitors?
These are just a sampling of the common questions I see asked by beginner home recording enthusiasts. It’s common to feel a little over your head when you are just getting started.
My goal with this article is to clear up some of the confusion, as well as make a few gear recommendations you can use to get the ball rolling. Of course, there is rarely a case of one piece of equipment being the best over the others.
My recommendations come both from personal experience and common recommendations from the community. However, audio is a very subjective art. What sounds fantastic to one set of ears can sound lifeless to another. With that disclaimer, let’s begin!
Where Do I Begin?
The answer to this question is going to vary from person to person. The answer will depend largely on the overall scope of the project. Are you setting up a home recording studio solely for your personal use? Will you be recording with additional bandmates? How many instruments are you looking to record?
It’s a good idea to start with the end goal in mind. In this article, I will focus on some recommendations for someone looking to set up a basic recording studio. This usually entails the ability to record one or two instruments and have most of the controls be digital.
Setting up larger home studios is best left to long, more in-depth articles.
Nevertheless, the first starting point for any home studio is going to be the recording environment. The room in which you record will have an impact during both the recording and during the production of the track.
This process can be as complicated as building an entire room from scratch or modifying an existing one. The end goal of acoustically treating your room is to control the room’s impact on your recording. The natural reverberations of your room can result in a metallic quality being present in any microphone recording.
You’ll avoid these unwanted reverberations by hanging acoustically absorbent materials in trouble locations within the room. This can be as simple as an old duvet, or as complicated as bass trapping foam that is custom fitted to the corners of your room.
Once you have your room treated, the next step is to start picking out your gear. Each instrument you want to record is likely going to need different types of gear. However, most home studios are going to require the following common pieces of equipment:
- Computer + DAW
- Audio Interface
- Microphone
- Monitors
- Headphones
Choosing A Computer For Home Recording
The computer you choose is going to have a lasting effect on your recording. What we’re looking for is a computer that can handle recording at a high bitrate as well as handle the audio processing of multiple tracks. Without getting too technical, here’s a basic list of the specs you’d need:
- 16 GB of RAM
- 2.5 GHz clock speed
- 1 TB Hard Drive storage
- At least 2 USB ports
These are the minimum specs you’d want to look for. The ability to upgrade your sound card is also a plus. Here are some recommendations for laptops that are well suited to music production. I personally recommend using the largest monitor possible for your home recording studio. This way you will be able to mix with plenty of screen space to spare.
This usually means using a desktop, but you always have the option to use a laptop if you want a little more portability. Just make sure to buy an external monitor if you decide to go this route.
What D.A.W. Is Best?
People will be arguing about this question until the end of time. The good news is, most D.A.W.s are perfectly acceptable. As long as you go with a reputable company, the D.A.W. will not be the limiting factor in your recording.
There are plenty of articles online which go through each D.A.W. in detail. I suggest doing a bit of research and picking the D.A.W. that will suit your needs. Personally, I use Logic Pro and have never had any issues. It comes with lots of high-quality stock plugins that I still use on occasion.
Should I Go Acoustic or Digital?
This is a common question raised by many beginners. Should I be buying acoustic pianos and acoustic drum sets? The easy answer is: absolutely not. For one, acoustic instruments bring with them a ton of other problems.
They are loud, expensive, take up lots of room, and most importantly – are difficult to record. All it takes is one look at the estimated cost of micing an acoustic drum kit to make the prospect of a digital drum kit much more appealing.
I recommend you go digital for both drums and piano. This will save you time, effort, money, and you won’t have to sacrifice on quality.
If you are new to electronic drum sets, here is a great guide to get you started. You can also check out a similar guide for digital pianos.
Do I Need An Audio Interface?
Usually, the answer is yes. However, more complicated setups will need a multi-track mixer. If you are just planning on recording a few instruments you can get away with a basic audio interface.
The only time you won’t need an audio interface is when you are doing everything digitally. Even then, you’ll need an audio interface to connect your monitors.
For those of you who are complete beginners, an audio interface is a device that connects your hardware to your computer. This is what you will use to record your instruments, microphones, and control your monitoring. The interface changes the format of the incoming audio into something that can be processed by your computer.
In the past, this conversion of audio would result in a loss of recording quality. However, technology has advanced to the point where you can get a professional sounding recording with entry-level gear.
I’d recommend any beginner stick with some simple like the Focusrite Scarlett Solo.
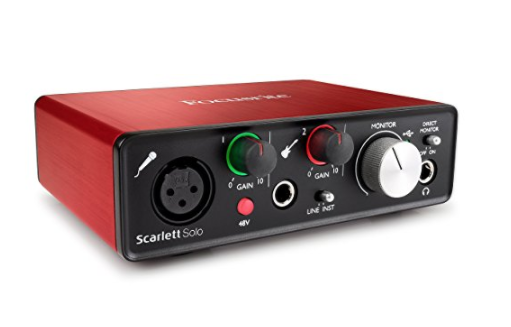
It’s easy to use and the sound quality is fantastic. It even has a built-in DI for any guitar players out there. At $99, you can’t go wrong.
Which Microphone Should I Use?
Most people will be able to get away with using an entry-level condenser mic to start with. Condenser mics are generally used in the studio for recording anything that will benefit from a warm recording quality. This includes acoustic guitar, vocals, acoustic piano, or any other acoustic instrument.
Things with higher sound pressure levels (SPL) will require the use of a dynamic microphone. This includes amplified guitars, drum kits, or amplified keyboards. However, you can usually get away with using a DI to record your amplified instruments.
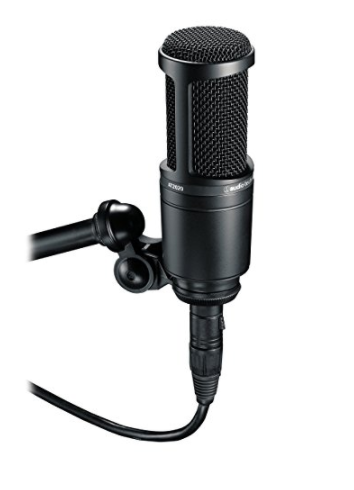
A good starter microphone for recording is the AT2020. It’s priced around $99 and will give you a number of years of high-quality recordings.
Monitors and Headphones
The monitors in your studio are going to be integral for mixing and mastering your tracks. They’re the tools you will use to accurately hear the different levels, stereo placement, and frequency analysis of all your recordings.
The most important thing to consider here is accuracy. Your monitors need to have what is called a “flat” frequency response. In other words, there should be no coloring of the frequency spectrum.
Consumer speakers and headphones have artificially colored frequency outputs. This means the manufacturer has boosted (or cut) certain frequencies in order for the product to sound more pleasing to the listener.
This should be avoided at all costs with mixing equipment. You need to accurately hear the output in order to place each track within the mix. Without high-definition equipment, it will be very difficult to produce a clean mix that is balanced and isn’t muddied by unwanted frequency clashing.
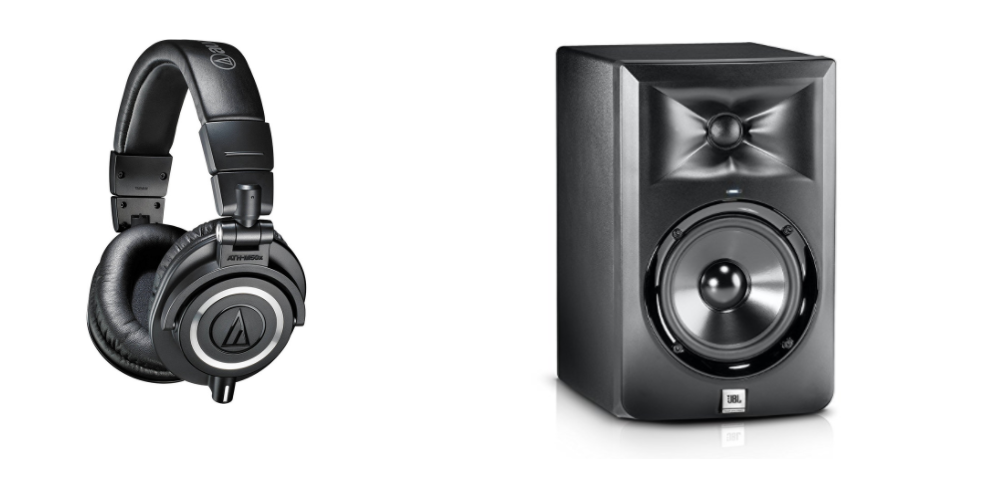
Unfortunately, this is going to cost a little money. I recommend you check out the above options – Audio-Technica ATH-M50x and the JBL LSR305. These are both well respected within the community.
I should also mention that there is some argument over the effectiveness of using studio monitors in an untreated room. You may just want to settle for studio headphones until you can sort out your acoustic treatment.
That pretty much sums it up for the basic equipment you need to get started. You’ll also want to allocate a portion of your budget to connecting cables and other smaller accessories. If this seems like an intimidating amount of gear, I recommend just slowly accumulating the gear throughout the years.
Remember, there is nothing wrong with buying used gear and saving a ton of money!
I hope you have found this article helpful. If so, I’d really appreciate it if you give it a share on social media.
Until next time!
About the Author: Glen Parry has been producing music on his computer for over 5 years. He’s done everything the hard way so you don’t have to. You can find more musical advice and audio gear buying guides over at audiomastered.com.